 |
Biscuit Joiner Evaluation
 If
the tool that you buy holds up against the checklist below,
you've got something you can work with. When biscuit slots are
not parallel to the face of work, flush-fitting joints are
impossible. The first criteria to check are the blade to base
relationship- it should be absolutely parallel. Take two pieces
of scrap about 10 inches long. Mark the back as if to edge join
them in two places. With the good faces clamped down on the bench
top, plunge cut for #20 biscuits by simply resting the machine on
the bench top and aligning to the index marks. This is the benchtop
reference method of use. The resultant joint when fitted
with biscuits should be nearly perfect in alignment of the face
side. To form a 90- degree joint the complementary wall is simply
held vertical against a stop and the plunge cut made- this method
eliminates maladjusted fences and shaky hands. If it fails the
test, return the machine, no user adjustment is possible.

If it passes the benchtop test but is unpredictable in freehand use, the fence needs more careful adjustment - however, the fence is not needed at all for the most common biscuit joinery tasks since the benchtop reference method is the superior technique.
 Now some rules of
thumb: With the proliferation of biscuits by other than the
original manufacturer, where a little slip was desired, it should
take thumb pressure or a light mallet tap to install the biscuit;
it should not free-fall from the slot when turned upside down.
This is an ideal however, and real world says you may get some
play due to varying biscuit thickness and shaky plunge cuts.
Biscuit swell usually negates this effect. Test:
wet the biscuit, install it and let sit for 15 minutes. If you've
got a good interface fit, you should need pliers to extract the
biscuit from the slot, and it probably won't come out in one
piece. Once the glue has been applied to the slot, it is
advisable to spread it with a tool to ensure a complete wetting
of the wall surfaces to ensure optimum adhesion.
 If in
doubt about strength always use the largest size for the work,
however the smallest (#0) is amazingly useful for 50% or more of
typical joinery tasks. The #20 is usually the main plate, but I
would again use the #0 if I were to deeply profile an edge reveal
or shelf lip with an ogee or cove, etc. My bigger concern would
be biscuit exposure.
 Every machine
has a fine adjust for plunge depth. I like to set mine using the
#20 index because all others will then be calibrated likewise. I
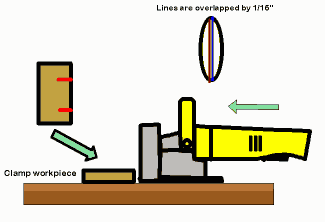
set the depth for about a plus 1/16" total recess in the
work (see tool graphic above); simply insert the biscuit, scribe
with a pencil, rotate the biscuit, re- insert and scribe again.
The resultant gap is then read. The slot length for a #20 biscuit
is about 2-5/8" long. Typically this setting gives a lateral
joint adjustment of about 1/8", suitable for most work.
 Biscuit joinery
is a method of assembly that has the following attributes:
alignment, strength, adjustability, and ease of fabrication.
These combined factors are more useful to woodworkers than any
other single system, thus a systemic viewpoint is important to
derive the full benefit of the method; in this instance, the
product is far greater than the sum of its parts. You may use fewer biscuits if you've got a
face or edge grain joint, because this is an optimum glue
situation. Use more if you're dealing with end grain or a miter.
Always remember however: no glue, fastener or technique will ever
be a substitute for poor joinery- careful preparation is all!
 For more information about biscuit
joinery see: http://www.ameritech.net/users/hankm/wme.htm
Bookmark This Page!
|
So
tell me, |
USE YOUR BROWSER'S BACK BUTTON FOR PREVIOUS SCREENS